Plain Bag to Gift Fab
 |
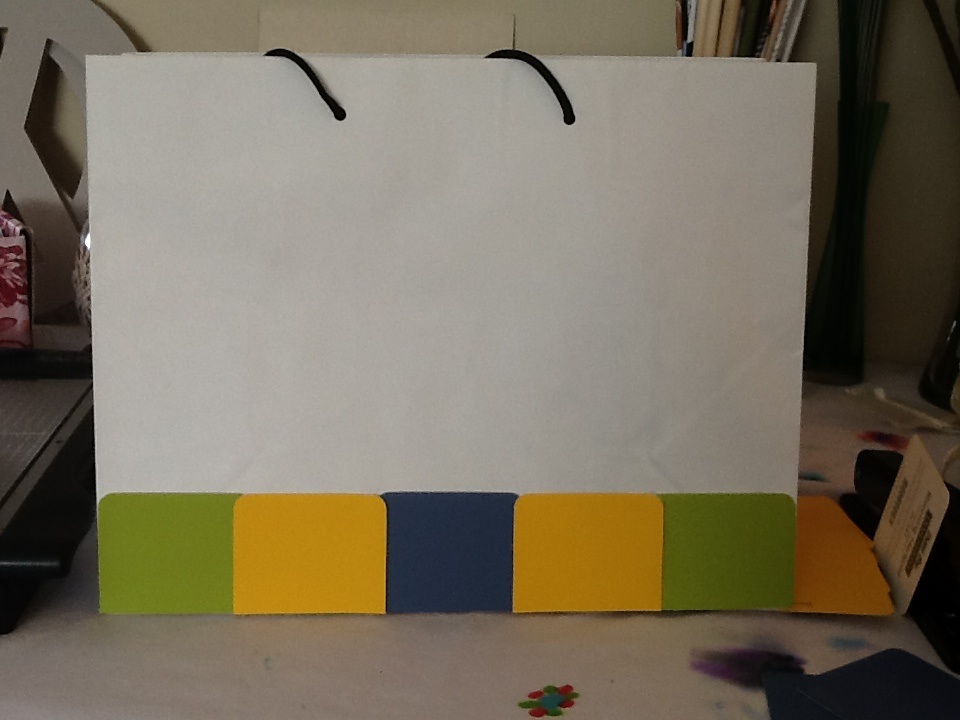
| Start with a plain paper shopping bag and paint sample cards. |
 |
| Cut off the writing that is on the front of the cards. |

|
| Start with a plain paper shopping bag and paint sample cards. |
|
| Cut off the writing that is on the front of the cards. |
 |
| Remove drawer pulls and sand lightly. Next, spray paint two coats with a color of your choice. |
 |
| I used white paint. I had a favorite designer in mind and wanted to create a version of her popular checkered patterns. |
 |
| Next, I found scrap paper with a fun black and white pattern. I cut circles to fit the top of the knobs. |
 |
| The circle shape does not need to be perfect because you will glue crystals around the edge of the paper. Mistakes are easily forgiven. |
 |
| Use E 6000 to glue each crystal to the edge of the paper. |
 |
| Last, use a small bristled paint brush to free hand polka dots and stripes. Craft glue from your local hobby store will do the trick. Allow the paint to dry overnight. Finish pulls with a coat of polyurethane, which will give the pulls a finished look. |
 |
| Done! These pulls give the bathroom a fresh, updated look. |


 |
Hot glue the circles together with a dot...not a lot! |
 |
Press together. |
 |
Hold in place until set. |
 |
Cut leaves. It looks like a mustache. :) |
 |
Hot glue leaves to the bottom of the largest circle. |
 |
Glue the contrasting color to the center. I used black felt but you could also use a wool sweater. |
 |
The last step! Cut a large circle (any color) to glue on the bottom to tidy up the look. Secure with a safety pin. |
 |
| Beautiful! These make great gifts, too. |

 |
| Start with a newspaper section. You can use several sheets at a time. |
 |
| Fold the paper in half like this. |
 |
| Tear where you folded the paper. |
 |
| Take one single sheet and open. |
 | |||
| Have the torn side towards you. |
 |
| I use a paper quilling tool to start rolling the paper into thin reeds. You can find them at any craft store in the paper crafting section. If you don't have this tool, use a toothpick/bamboo skewer, or I've even used a bobby pin. |
 |
| Start rolling at the corner of the torn edge. This will ensure that the torn edge is rolled inside and the nice smooth edge is on the outside. |
 |
| Roll until you can no longer use the tool. Remove the tool and continue to roll by hand. |
 |
| Keep rolling the paper and try to keep it tightly rolled. |
 |
| Add glue to the corner to keep your paper reed together. You will want to make 10-15 paper reeds to start with. |
 |
| Flatten your paper reeds. I ran a pencil over mine to flatten. |
 |
| Connect the flattened paper reeds by placing the thin end of one into the wider end of another. Use a glue stick on both sides of the thinner end. |
 |
| Connect all of your paper reeds and allow the glue to dry. |
 |
| Start rolling the flattened reeds into a coil. Keep going until you have reached the desired diameter you want for your bowl. Hot glue the end flat to the coil. Start shaping your bowl by gently pushing down the center with your thumbs and pulling outer edges up. Go slowly! You don't want to pull the layers too far because your bowl will unravel. If this happens...roll it up again and try one more time. :) |
 |
| This small bowl was made from about 10 reeds and it 4 inches in diameter. |
 |
| Here are a few examples waiting to be sealed. I place my unfinished bowl on a baking sheet lined with wax paper. |
 |
| Here you can see examples of how you can adjust the design. One of the bowls has a bottom made of 6 coils glued together. Each small coil is made from one flattened paper reed. I then glued my long strand of paper to one of the small coils and then started wrapping it around to make my bowl. |
 |
| To seal your creations, apply two coats of a mixture of half white glue and half water. You must make this solution so that the glue can get between the layers to hold the shape. Coat the inside and then flip it over to coat the outside. As soon as the first coat is dry to the touch you can go ahead and add a second coat. |
 |
| Here I got creative and added a coating of glitter to the outside only of one of my bowls. I did this after my second coat of glue mixture. If you add glitter you will need to add a third coat of glue mixture so the glitter sticks. |
 |
| For the final step you need to add two coats of clear varnish. I prefer the traditional liquid varnish because it dries without any scent. The spray gloss coating also works just as well, but I've found that the brand I tried has a chemical smell that does not go away. |
 |
| Make sure you have a large space where you can begin the untangling process. Soon, you will be able to discover ribbon scraps you never knew you had. |
 | |
| Clothespins are perfect for storing small strings and yarn. |
 |
| Once your string is untangled, begin by wrapping it around the larger end of the clothespin. |
 |
| Tuck the end of the string into the mouth of the clothespin to secure. |
 |
| The finished project. Store in a glass container. String/yarn clothes pins are pretty to look at, too. |
 |
| Ribbon on the roll is easy to store by hanging. Use a bell or other "thing" that won't allow the ribbon to slip off. Tie a ribbon to the bell and string through the rolls of ribbon. |
 |
| Hang the rolls of ribbon from a reliable source. |
 |
| You can easily get your ribbon off the roll. Tape the end when done to keep the roll from unraveling. |
 |
| Now the pretty part! Use a metal dress form to loop your yarn scraps on to. |
 |
| Layer the colors and size for a unique look. |
 |
| The finished product! Much prettier than a bin full of tangled ribbon. |

